My new friend, Shelly from DIY Mama is here to show us how to make these amazing invitations through using PicMonkey! Check it out…
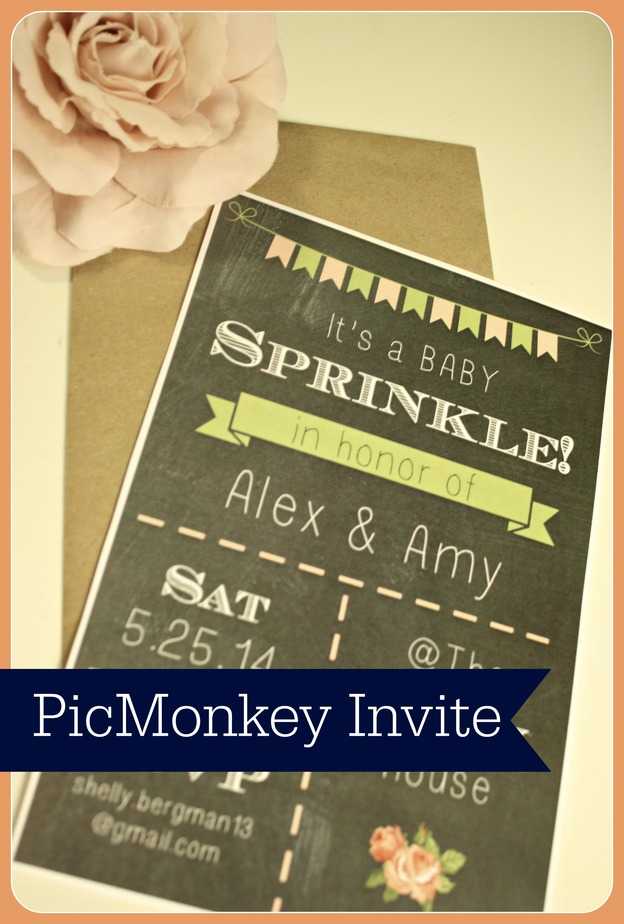
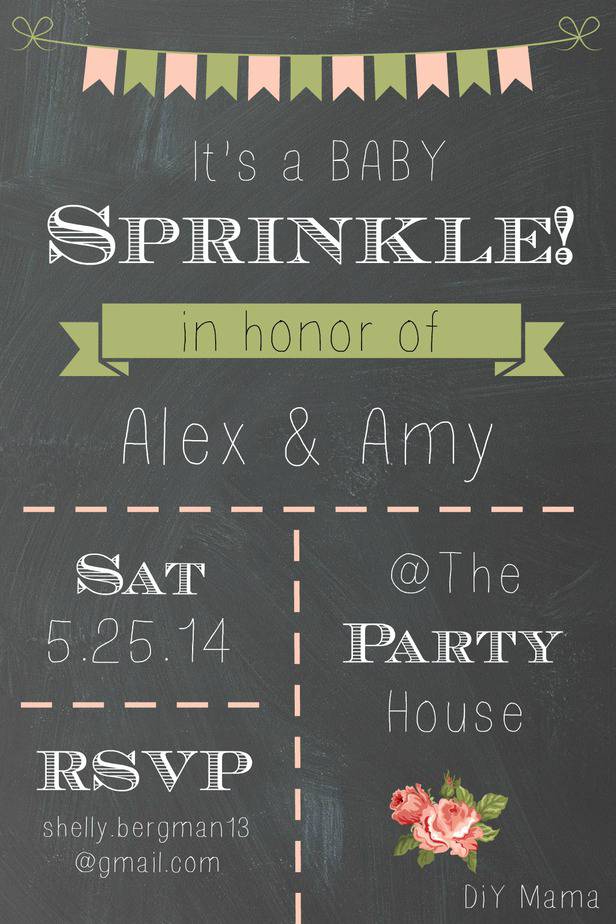
My sister is having her second baby girl in July!!! We are throwing a baby sprinkle for her (smaller than a shower) and I decided to try my hand at making her invitations. I’ve dabbled in PicMonkey to edit pictures as well as make my Tuesday Truth quotes but hadn’t made an invite. Not that the invite is pro graphic designer material, but it turned out rather well considering I could have paid at least $20 + printing if I would have gotten a PDF on ETSY. The total cost for this project was $18.22 (15 invitations.)
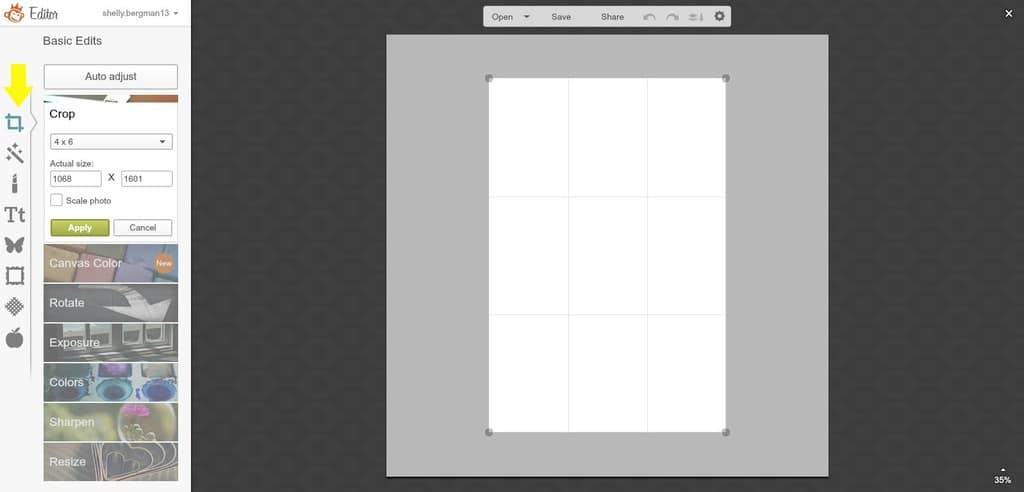
The first step, once you’re in PicMonkey, is to click the ‘Basic Edits’ button on the left menu to size your canvas. Click ‘Crop’ to select your desired size and hit ‘Apply’. There will be yellow arrows in the areas I’m explaining in these steps.
The second step is to choose what type of background you want. You can layer choices as well. For example, you could choose a solid color and layer a textured overlay. In this example, I will be using the blackboard background found in the ‘Themes’ menu under ‘School U’.

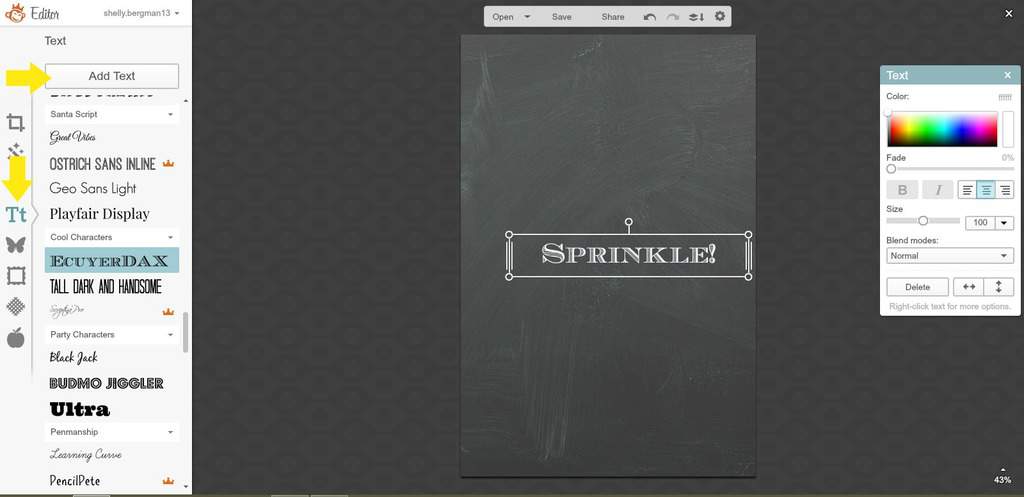
The third step is to add text by clicking the ‘Text’ option in the menu. When you click ‘Add Text’ a box appears saying ‘Type your text here’ where you can choose the font, size, color and blend mode. There are tons of free typeface options you can play around with, or become a member to access all fonts.
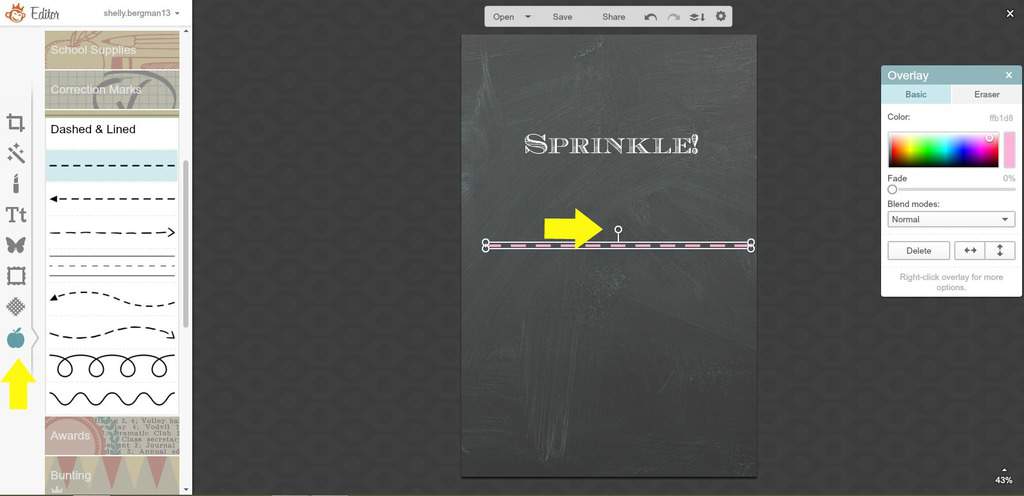
Once I write out all my text I don’t worry too much about spacing or sizing until I’ve added my graphics, which is step four. There are two different areas in the menu to add graphics. The first is by going to the ‘Themes’ menu and finding a graphic from within a specific theme. The dashes below are from the ‘School U’ theme. Every text box and graphic box will have a small circle at the top which allows you to rotate the image once you see the circle of arrows. One feature I wish PicMonkey had was to allow you to bend text or graphics boxes…maybe they will someday.
The second way to add a graphic is to click on the ‘Overlays’ button in the menu. The graphic I have chosen is under ‘Banners’ which are not only great for invitations but also for making pinnable images for your blog!
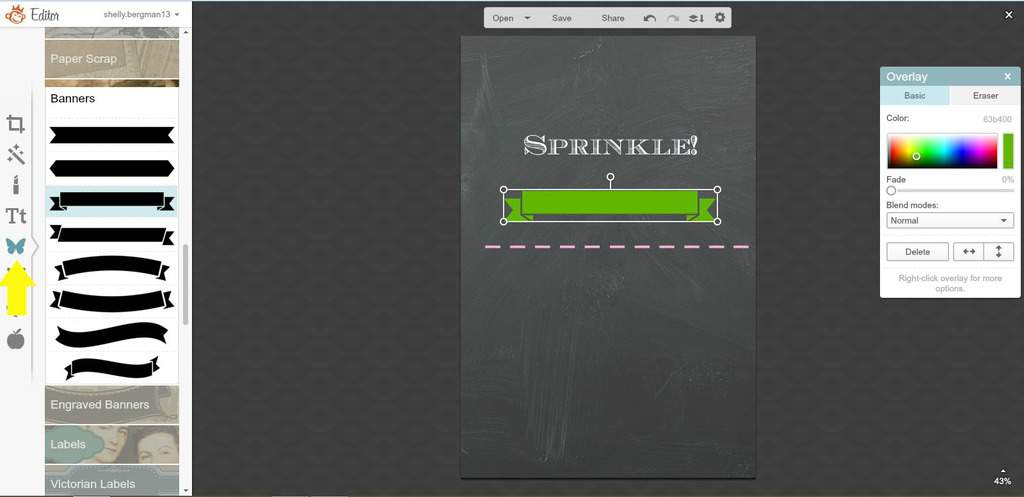
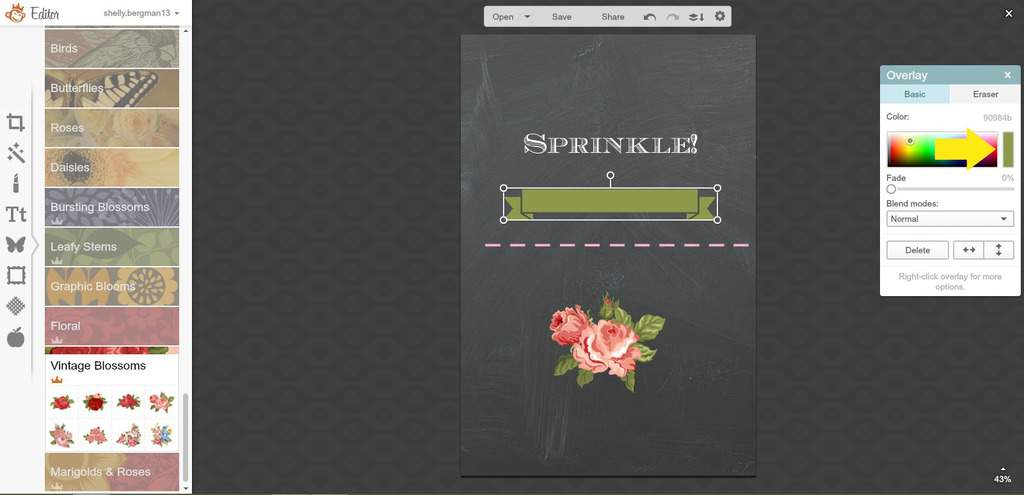
The final step, in my invitation, is to color match my graphics. I chose a rose graphic from the ‘Overlays’ menu (under ‘Vintage Blossoms’) to use as my color theme for the invitation. Once you highlight a graphic or text box, by clicking on it, you can choose it’s color one of three ways. You can move your mouse around the color grid until your desired color is found, type in the color code (light grey set of numbers and letters) or use the eye dropper tool to select a color already on the screen. Below, where you see the yellow arrow, is a rectangle that you will click once to use to eye dropper function. Once your mouse turns into the dropper, you can hover over anything on your screen to color match. In the invitation I made, I color matched the green banner and bunting to the leaves on the roses and the pink dashes and bunting to the rose.
The final invitation! This invitation is very ‘loosey goosey’ (I’m not sure I’ve ever used that term) because there are very few people coming and they all already know about the party. If I was making a more formal invitation I would be sure to add more info, such as an exact address, what to bring, the time and where they’re registered.
Do you guys just LOVE PicMonkey or do you use another online editing tool? I think the best way to learn a program is by playing around with it and not being afraid to try every feature. Anyone else ever heard of a sprinkle? 🙂 I’m so excited to have another niece to spoil and do nails with!! <3

I am a craft loving, hot dog eating, flower picking, Disney obsessed, new mommy that lives with her handsome/nerdy husband and attention craving puppy. I am no longer a career woman but a stay at home nester…which leads me to many hours of DiY crafting while the little bean naps. Learn with me from my failures (and a few wins) on organizing, DiY and baby raising!
Facebook https://www.facebook.com/diymamablog
Pinterest http://www.pinterest.com/bergman0353/
Twitter https://twitter.com/Shelly_Bergman
G+ https://plus.google.com/u/0/108863281060881553855/posts


I love Pic Monkey but I do enjoy hearing about the features I may not know about or be using. Sprinkle is a cute idea!
Were there any you didn’t know about Laurie?! I kept it pretty simple as a guide for newbies like myself but I know you can do much more with PicMonkey! I thought ‘sprinkle’ was so clever when I’d first heard of it too!
Love, love, love Picmonkey. So, truly enjoyed seeing this tutorial today and will truly have to remember this now in the future when I want to do invites for the kids and such now. Thanks for sharing this here today and totally pinned 🙂
Thank you Janine! It was SO much cheaper than paying someone to customize a PDF on ETSY! I know with more practice, they might even look as good as the ETSY invites! 😉 When you make one, I’d love to see!
I use Picmonkey a lot for photo collages. I hadn’t thought about using it for invites. Love the idea! Thanks for sharing the tutorial.
I’d never thought to make a collage with it Jennifer! Do you mean like on this post of yours? http://bit.ly/1jX3M7X If not, send me a link to one that has a collage so I know what you mean. 🙂
Thank you Tamara. 😉 Are you hosting any of them? If you are, and you make your invites, I totally want to see!
I love her blog! My sister-in-law is having a baby in June and my sister is getting married in October and it’s showers galore.
Thank you Tamara. 😉 Are you hosting any of them? If you are, and you make your invites, I totally want to see!
I LOVE Picmonkey.
Where did you print your invites? Two years ago I made our Christmas cards on Picmonkey and they were sooooo cute…on the computer. Then I printed them on photo paper at Target and I was so disappointed. The quality was not at all what I had hoped for. I’m wondering if next time I need to go through a professional printer. (still cheeper than TinyPrints)
Me TOO Stephanie!! I was disapointed from the quality from Kinkos. The top image does not have a filter…the pink and green were off and the black was not saturated. It didn’t really matter to me because it wasn’t for a logo or anything but if you were set on colors (as your wedding colors or school colors) I wouldn’t get them printed at Kinkos. I’d gone there b/c I’d gone to Staples recently and they did a good job but it was terribly expensive! Not joking, a blog planner PDF I printed cost $400…they didn’t tell me the price before they printed…I felt really bad to tell them I didn’t want it!
This is fantastic, thank you! Sharing!
I’m glad you liked the tutorial Joy!!
I use PicMonkey and like it because even I, the craft-challenged, can manage it. But I didn’t know (or think too hard) about being able to make invites like this. So cute! Awesome idea, thanks for teaching us.
Thanks Katy! I LOVE how easy it was to figure out and remember how to use. 😉 You should totally use it to make invites for your next get together! I’d love to see!
This is great! I use Pic Monkey all the time for creating blog images, but never thought to use it for an invitation. Will definitely be remembering this when my son turns 2 in a few months!
Yea, it’s perfect for adding text for Pinterest for our blogs, isn’t it!? I’m so excited for you to make an invite for your son’s b-day! I gotta see it!
This is so awesome! I am totally bookmarking this one. I love PIcMonkey, and i know i’m not using it to its fullest potential. I am always in awe when I see people making it look so easy and beautiful! Thanks for such a helpful post!
I’m glad you liked the tutorial Stephanie! I am in awe of what other people use it for! You can really do a lot with it and it’s not that hard to make something awesome!
I had no idea you could do that much withPicMonkey! I’m lucky I know how to add pictures.
Kim, hopefully now you’ll feel a bit more comfortable to try out more features! I’m sure there are tons that I haven’t even discovered yet but I look forward to finding them!
This is awesome! I actually use Canva now more than PicMonkey but I still like PicMonkey too! You really can do some great things without having Photoshop these days!
I tried Canva about the same time that I tried PicMonkey and wanted to get a good handle on one before trying to learn the other. Why do you like Canva better?
I LOVE PicMonkey! I used it to make my blog header, as well as sized that down for FB, Twitter and Goggle headers too. And I have tried a few invitations as well. I love that you can edit it again later too.
Great tutorial!
Isn’t that cool that they have templates for those?! How do you edit something later on?
I just learned a ton! I’m sharing this with the parents over at http://www.facebook.com/1Corinthians13Parenting
Glad you liked the tutorial Lori! I hope you’re able to try it out sometime soon! I’d love to see!